The Live Ball. (LB) Classes 4 - 8.
Animate the Mooly ball rig, as a playful and lively squirrel moving through an obstacle course you design in class. Students should use videos of squirrels for guidance on behaviour. Make sure you include some changes in height and level. Playblast from a perspective view. Scene should be 8 sec. long (192 fr). Featured animation principals: Timing, Ease In/Out, Arcs, Squash and Stretch, Anticipation, Staging, & Appeal.
What I'll be grading on this assignment:
- Have you designed a complex and interesting environment with textures?
- Does your ball act and emote like a squirrel?
- Do you meet all the required parameters of the assignment?
- Is there a clear sense of mass with Slow In/Out at the apex of the jumps?
- Are you effectively using Arcs, Squash & Stretch, Overlap & Follow Through?
--------------------------------------------------------------------------------------------------------------------------
A fun example of some Live Ball animation by Mani Vemulapalli
--------------------------------------------------------------------------------------------------------------------------
1) Time for some reference!
To get started, lets find some reference videos! You can find some videos of squirrel behaviour here:
\\180net1\ANM\assets\Rigs\Simple_and_Limited_Rigs\Bouncing_Balls_with_Tails\
--------------------------------------------------------------------------------------------------------------------------
2) Let's build our set.
Once we've selected and analyzed our references, we need to create a space for our squirrel to act. Try to design a space that offers lots of interesting opportunities for leaping and climbing. Some quick sketches are a good idea before you start building in Maya. This is what I came up with for a set. I created a camera to frame the set clearly and leave lots of room for my squirrel to run around.
 |
| Basic primitive polygons are a good place to start, but be sure to add textures and variation in shapes. |
--------------------------------------------------------------------------------------------------------------------------
3) Plan out the animation.
Now I draw out a basic plan and sort out the kinks. What you see below is my first plan, if you mouse over the image below, you can see what I ended up with after a few iterations:

A good plan usually takes several attempts. I like my final idea much better because it has more changes of direction. I've also included some notes about squirrel-like behaviours and where I'll add them to the scene.
--------------------------------------------------------------------------------------------------------------------------
4) Time to work in Maya: Slow In/Out.
After I've set up the animation scene by referencing in the set and the character, I'll quickly set some keys and time them out to match my plan. This will go pretty quickly, because I've already figured out what to do and I'm just executing on my plan. Here's my first pass, just rough timing and placement in the scene. I've put my planning on a free image plane in the scene to make it easier for me to refer to.
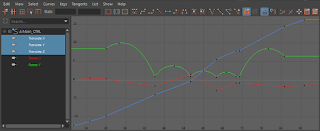
Not too bad, but it feels pretty floaty and weightless. I'll do some graph editor work to get the physics of the hops looking a little better. Here's my Translate Y curve (or TranY ) for the Main_CNTRL.
On the TranY, I'll break the tangent handles at the bottom of the hop and bend them so that I have nice slow in/out at the apex of the hop. You can see in this image what that looks like:
Next, I'll work on TranX and TranZ. Once the Ball leaves the ground, it cannot speed up or slow down in Translate X or Z (unless it has a cool jet-pack). That means those curves need to be linear. I'll just select the tangent handles and hit the button to have them interpolate in linear mode.
Here's what I have right now:
I'll show the TranY along with the modified TranX and TranZ. You can see from the moment the Ball leaves the ground to the moment it lands again, it's Translate X and Z are linear. Like this:
Here's what I have after modifying all of the translation curves in the Graph Editor:
--------------------------------------------------------------------------------------------------------------------------
5) More Maya Fun: Squash and Stretch.
Squash: When I squash the ball, I want to make sure it is parallel to the surface it's striking. If the surface is at an angle, the squash will be angled too.
Stretch: I'll want to make sure that the stretch is aligned with the path the ball is travelling (this is another time where motion trails come in handy.) It's easiest to stretch the ball first, then use rotations to align the stretch along the path of travel. See the picture below for an explanation.
 |
| Stretching follows the path of action of the ball, Squashing will be parallel to the surface it contacts. |
Once I've animated the squash and stretch for one bounce/hop, I can copy and paste the animation to all the other hops. Remember the order is stretch/squash/stretch, with the squash on the contact frame and the biggest stretch immediately before and after the contact. I'll adjust the copied animation for each bounce to be greater for big jumps, less for little ones. The rotations will need to be adjusted to make sure the Squash and Stretch is aligned correctly.
This is what I end up with:
--------------------------------------------------------------------------------------------------------------------------
6) Overlap, Follow Through and Drag
 |
| The blue outlines are the first keys I made, the red outlines are breakdowns and in-betweens. |
After a few passes I have something I'm happy with. A playful flick on the tail at the start of the scene adds just the squirrely quality I need. Here's the final result of the Live Ball animation:
--------------------------------------------------------------------------------------------------------------------------


No comments:
Post a Comment